The wrong mulch can smother roots, invite fungus and pests, and waste a full season’s watering and weeding budget. I’ve seen garden beds fail simply because the “cheap bag” choice baked the soil, tied up nitrogen, or blew away after the first storm.
What Actually Changed My Results When Using Mulch
I used to think mulch was just about covering the soil to make the garden look cleaner, but I learned the hard way that the type and depth make a huge difference in how plants respond. In one of my own beds, I applied a thick layer of fine material thinking it would block weeds better, but instead it stayed too влажный and I started seeing weak growth and signs of rot near the base of the plants. That experience made it clear that more mulch is not always better, balance and context matter more than quantity.
Over time, I started focusing on matching the mulch to the plant and environment instead of just using whatever was available. For example, switching to a lighter, breathable layer in vegetable beds improved airflow and reduced pest issues, while keeping a slightly thicker, coarse layer around shrubs helped maintain moisture more consistently. Small adjustments like keeping space around stems and checking how fast the soil dries ended up having a bigger impact than changing fertilizers or watering schedules.
From what I’ve seen, mulch works best when you treat it as part of the soil system, not just a surface cover, but something that needs to match how your plants actually grow.
Mulch isn’t decorative-it’s a soil-management tool. Pick the wrong type or depth and you’ll pay in stunted growth, more irrigation, and preventable disease pressure.
This article gives you a practical decision framework to choose the right mulch for your beds-matched to plant type, climate, and soil needs-plus exact depth guidelines and red flags to avoid.
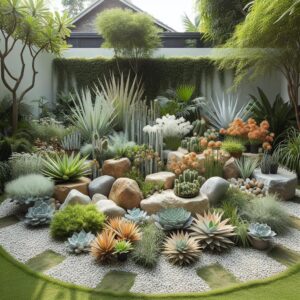
Mulch Matchmaking: Picking the Best Mulch Type (Wood Chips, Shredded Bark, Straw, Compost, Stone) for Your Plants, Soil, and Climate
A 2-3 inch mulch layer can cut surface evaporation by roughly 30-50%, but the most common failure I see is pairing the wrong material with soil texture and climate-creating waterlogging, nitrogen tie-up, or heat stress. Match mulch to the plant’s rooting pattern, your irrigation schedule, and how quickly your soil dries between soakings.
| Mulch Type | Best Fit | Watch-outs / Climate Notes |
|---|---|---|
| Wood chips / Shredded bark | Trees, shrubs, perennials; sandy soils needing moisture buffering | Keep 3-6 inches off trunks; fresh chips can immobilize N at the surface-top-dress with compost if growth is pale; excellent in hot/windy sites |
| Straw / Compost | Vegetable beds (straw as cover; compost as soil-feed), cool-season crops | Straw can carry weed seed; compost must be mature or it heats and crusts; in humid regions, avoid piling against stems to reduce slug/fungal pressure |
| Stone / Gravel | Mediterranean plants, xeriscapes, alkaline-tolerant species; drip systems | Raises root-zone temps and reflects heat; can worsen drought stress in full sun; check pH/EC trends with SoilTest Pro if using limestone-based gravel |
Field Note: After swapping a client’s river rock (cooking their lavender at 105°F surface temps) to 2 inches of arborist chips and moving drip emitters under the mulch, midday wilting stopped within a week.
Keep Weeds Down, Water In: Expert Mulch Depth, Layering, and Edge-Control Techniques That Prevent Rot, Pests, and Nitrogen Tie-Up
Most mulch failures aren’t “bad mulch”-they’re bad depth: over 4 inches against stems traps moisture, drives collar rot, and creates slug and rodent cover; under 2 inches you’ll be hand-weeding again in weeks. Layering also backfires if fresh, high-carbon fines are mixed into soil, triggering nitrogen tie-up right where seedlings feed.
- Depth targets: 2-3 inches for shredded bark/composted wood; 1-2 inches for fine compost; 3-4 inches for coarse chips only in paths or around established shrubs (not crowns).
- Layering sequence: Kill weeds first, then lay cardboard (overlap 6-8 inches, remove tape) and wet it; top with mulch, keeping the total mulch layer ≤3 inches over planting zones to avoid anaerobic pockets.
- Edge control & rot prevention: Maintain a 2-3 inch “mulch-free donut” around stems/trunks; trench edges 3 inches deep or install steel edging to stop creep, and map irrigation wetting patterns with HydroCAD (or a simple catch-can test) so mulch doesn’t stay saturated.
Field Note: After correcting a client’s “volcano mulch” to a 3-inch cap with a 3-inch stem clearance and re-edging the bed, we eliminated recurring crown rot in one season without changing plant selection.
Cost vs. Performance: How to Compare Mulch Longevity, Refresh Schedules, and DIY Sourcing for Low-Maintenance Garden Beds
Most homeowners overpay on mulch by buying “premium” bags, then apply 1-2 inches-thin enough to bake off and slump within one season. Compare options by cost per bed-year (material + refresh labor), not cost per bag, and log thickness/coverage in iScape to stop guesswork.
| Mulch type | Typical longevity | Refresh schedule & performance notes |
|---|---|---|
| Shredded hardwood | 8-14 months | Top-up 1-2″ annually; knits together for slope stability, moderates weeds best at 3-4″ installed depth. |
| Pine bark nuggets | 12-24 months | Spot-fill every 18-24 months; slower breakdown but gaps invite weeds unless underlaid with compost + tight edging. |
| Arborist wood chips (DIY) | 12-36 months | Top-dress 1-2″ yearly; lowest cost per bed-year if sourced free/low-cost, but expect color fade and occasional twig cleanup. |
Field Note: After a client switched from bagged cedar to free arborist chips and standardized a 3.5″ install depth, their refresh dropped to a quick 1″ top-up each spring and total mulch spend fell by roughly half over two seasons.
Q&A
FAQ 1: What type of mulch is best for my specific garden bed (vegetables, perennials, shrubs, or pathways)?
Answer: Match mulch to the bed’s needs: moisture retention and soil improvement for planting areas, and durability for paths.
- Vegetable beds: Use clean organic mulches that break down relatively quickly (shredded leaves, straw certified weed-seed-free, fine bark). Keep mulch a few inches away from stems to reduce rot and slug habitat.
- Perennials and shrubs: Use longer-lasting органics (shredded bark/wood chips, leaf mold). These moderate soil temperature and steadily add organic matter.
- Trees and woody ornamentals: Coarse wood chips are excellent for moisture and soil biology; avoid piling against trunks.
- Pathways: Use chunky wood chips or pine bark nuggets for longevity; consider topped-up gravel where you want maximum permanence and minimal decomposition.
FAQ 2: How do I decide between organic and inorganic mulch-and what are the main trade-offs?
Answer: Choose organic mulch when you want weed suppression plus long-term soil improvement; choose inorganic mulch when permanence and low decomposition matter more than soil building.
|
Mulch Type |
Best For |
Pros |
Cons / Cautions |
|---|---|---|---|
|
Organic (wood chips, shredded bark, leaves, straw) |
Most planting beds |
Improves soil structure, supports beneficial microbes, buffers moisture and temperature |
Needs replenishing; some materials can introduce weed seeds (poor-quality straw/hay) or mat if applied too thick (fine sawdust, thick leaf layers) |
|
Inorganic (gravel, stone, rubber) |
Paths, drought-tolerant landscapes, areas where you don’t want decomposition |
Long-lasting; good for drainage-focused designs |
Does not improve soil; can trap heat (stone) and complicate future planting; rubber can off-gas/age and is generally not recommended for edible beds |
FAQ 3: How much mulch should I apply, and how do I avoid common problems like rot, pests, and “mulch volcanoes”?
Answer: Apply mulch at the correct depth and keep it off crowns and trunks.
- Depth: Typically 2-3 inches (5-8 cm) for most organic mulches; up to 3-4 inches for coarse wood chips (don’t exceed this in poorly drained beds).
- Keep clearance: Leave 2-6 inches of bare space around plant stems/crowns; for trees, keep mulch several inches away from the trunk to prevent bark rot and pests.
- Weed control: Mulch works best over weed-free soil. If weeds are established, remove them first; consider a thin layer of compost under mulch for planting beds (avoid thick compost “layers” that can crust).
- Moisture and pests: Overly thick, soggy mulch can harbor slugs and promote rot-especially around vegetables. Use the minimum effective depth and avoid mulching right up to tender stems.
- Refresh timing: Top up when the layer decomposes to ~1 inch; don’t “stack” new mulch endlessly-fluff or rake and add only what’s needed.
The Bottom Line on How to Choose the Right Mulch for Your Garden Beds
Pro Tip: The biggest mistake I still see is piling mulch against stems and trunks-this “mulch volcano” traps moisture, invites rot, and becomes a highway for pests. Keep a clean 2-4 inch layer, but leave a 2-3 inch bare ring around crowns and woody bases, and refresh lightly rather than burying what’s already there.
Before you buy another bag, match mulch performance to plant needs and your irrigation: coarse materials breathe better for perennials, finer textures suit moisture-loving beds, and always vet any dyed or unknown-source product for contaminants.
- Do this now: grab a ruler and a notepad, measure mulch depth in three spots per bed, and record what’s there (type, depth, any fungal odor). Then schedule your next top-up for when it’s down to ~1 inch.

the dirt-under-the-fingernails creator behind Root & Bloom. My mission is simple: to make gardening accessible, sustainable, and beautiful. From indoor jungles to backyard vegetable patches, let’s get back to the basics and watch something incredible grow.